Fall is my favorite time of year. Not only because the weather is cooler (yay for sweatshirts!), the leaves are turning (so pretty!), the holidays are getting closer, but also the food is so good!
Take a look at my pumpkin bread from my last post, for example. MMM. Or apple cider. Or hard cider. Or mulled cider. Or spiced wine. Or apple ANYTHING. Which includes....caramel apples.
When I set out to make my caramel apples, I wanted to make homemade caramel. Just opening packages of caramel candy & melting it--that feels like cheating. I also wanted to make homemade caramel without corn syrup (& that used heavy cream instead of evaporated milk, as I had bought a carton of heavy cream instead). I stumbled across a recipe for chewy caramels & figured I could just dip the apples in the caramel before it cooled.
Surprise, it worked! The caramel was a little more runny than normal caramel for apples...so I may play around with the recipe to thicken it up a little. But boy is that some darn good caramel. & very sweet, which may go with tart apples really well.
Caramel Apples:
Ingredients:
1 c. heavy cream
1 & 1/2 c. white sugar (I used cane sugar)
1/2 c. honey (I used Michigan pure raw honey)
7 Tbs. butter (one whole stick minus a slab), room temp (I used unsalted butter because that is what I had)
Heat the honey & sugar in a pot on the stove on medium heat until melted & caramelized (it will darken in color & be really bubbly). I let this cook to about 250 degrees on my candy thermometer (I highly recommend you use a candy thermometer..I usually use a combination of the candy thermometer & the spoon test). While the sugar & honey are melting, wash off about 8-16 apples (double coating=8 apples) & stick them with a stick (I used short wooden skewer sticks, popsicle sticks will also work). Also warm the cream to a simmer.
Once the sugars are caramelized, whisk in the butter, a slab at a time. Then whisk in the cream a little at a time (it bubbles up). Heat until the mixture reaches about 235-240 degrees (or "soft ball"). Remove from heat & let it cool a little.
Once the bubbles go down & the mix has cooled (1-2 minutes), take each apple & twirl it through the caramel. Place on foil or wax paper (I used wax paper...the caramel still stuck to the paper, so it may have to be buttered or greased). Let cool a couple minutes, then repeat the process for a second coating if you are doing so. Let cool (may be refrigerated).
I haven't actually tried the caramel apples yet, but did lick the leftover caramel & it is REALLY good. I may also try making the caramel as candies to hand out along with gifts at Christmas. :)
EDIT: So now that its been a day... This recipe made very sticky caramel. It may be because it wasn't cooked long enough nor to a high enough temp (it was roughly 235-240 degrees according to my candy thermometer). Most of the caramel ended up pooled around the apples with a light coating on the apple. Sticking the apples in the fridge made it near impossible to remove from the wax paper (although once it set out for a while at room temp, it loosened enough to remove an apple). I need to play around with this recipe a bit to perfect it.
Tuesday, October 20, 2009
Monday, October 12, 2009
Pumpkin Bread
So, I know I haven't posted in awhile. I have a few recipes that I've been meaning to share (including Tortilla Espanola and Eggplant Parmesan), but I just haven't found time to actually upload the pictures nor sit down to write an entry. But I just tried this recipe for Pumpkin Bread and it is just THAT amazing that I had to sit down & immediately share it, even though no pictures are uploaded yet (I'll add them....eventually). This bread is moist and has just the right hint of pumpkin & spices. I also love the slight brown sugar glaze that I added.
The original recipe for Pumpkin Bread is found over at my favorite site, allrecipes.com.
Pumpkin Bread
Ingredients:
1 (15 oz) can pumpkin puree
4 eggs
1/2 c. canola oil
1/2 c. sweetened applesauce (plain, not cinnamon)
2/3 c. water
2 c. white sugar
1 c. brown sugar
1 c. whole wheat flour
2 1/2 c. all-purpose flour (I used unbleached all-purpose flour)
2 tsp. baking soda
1 1/2 tsp. salt
1 tsp. ground cinnamon
1 tsp. ground nutmeg
1/2 tsp. ground cloves
1/4 tsp. ground ginger
Directions:
1. Preheat oven to 350 degrees F. Grease and flour three loaf pans (I used two glass, one metal).
2. In a large bowl, mix pumpkin, eggs, oil, applesauce, water, and sugars. In a separate bowl, mix flours, baking soda, salt, and spices. Stir the dry ingredients into the pumpkin mix until just blended (don't over-stir!). Pour into pans.
3. Bake for 40 minutes.
4. Mix a little bit of water and brown sugar together (I guessed, but it was maybe 2-3 Tbs. water to like 4-5 Tbs. brown sugar) and drizzle and spread over the top of the loaves.
5. Return loaves to oven & bake an additional 10-20 minutes until done (test with a toothpick in the center, if it comes out clean, its done).
I let the bread sit in the pans for about an hour to cool before trying to remove them.
*NOTE: I bought a 29 oz can of pumpkin because it was on sale & all they had left. I could have easily doubled the recipe, but I only have 3 loaf pans. So I refrigerated the rest, and I am sure I'll be making this recipe again in a week.
I loved how easy this recipe was to just throw together. No mashing of bananas like for banana bread, no shredding of zucchini like for zucchini bread. Just scooping the pumpkin out of the can. I did feel guilty for using canned pumpkin though (as my boyfriend pointed out "BPA lined tin can! ARGH!"). So I'm kind of wondering what this recipe would taste like using the insides from an actual pumpkin. Don't know if I'd want to go through all that trouble though...maybe for some day that I'm feeling adventerous.
If you try this recipe on your own, I hope you enjoy it as much as I do!
Tuesday, September 8, 2009
Brownie Chocolate Heaven

Following with his new-found tradition of eating homemade/organic/natural/local foods, my boyfriend asked me the other day to try out a new brownie recipe. I must say, I was a bit confused, as I consider myself a pretty good baker & make a mean blonde brownie (which the boy LOVES). Why change it up? Well, first of all, a blonde brownie isn't as chocolate-y as a normal brownie. So, I decided to try a new recipe.
The recipe that my boyfriend wanted me to try is the Great Brownie Recipe from Greyston Bakery. I followed the recipe pretty exactly (follow that link), except I don't have parchment paper, so I just greased & floured my pan (& left the brownies in the pan to cool & serve), & I melted the chocolate topping in the microwave (30 seconds, stir, 30 seconds again, & it was melted).
I don't know how much of a difference it makes, but I used cane sugar instead of plain ole Meijer generic version sugar, & Ghirardelli bittersweet chocolate bars (4 oz each, so you will need 2). I highly reccommend the better chocolate, as it is a prominent flavor in the brownie.
These brownies turned out really really well. If I make them in the future, I may try & pick up a bag of Ghirardelli bittersweet chocolate chips instead of the bars just to make things quicker (so that I don't have to chop up the bars).
If I feel so inclined, I'll try taking a picture later & post it.
Tuesday, August 25, 2009
Veggie Dub
What the heck is a dub, you say? A "dub" is simply a tortilla filled with different varieties of sauteed/grilled fillings and sauce. They were made famous around MSU at a place called Menna's Joint. And I must say, they are fabulously delicious.
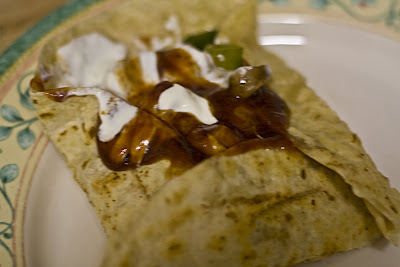
So, I had the idea yesterday to try and make one at home, with ingredients that we had from the farmer's market. Since we didn't have any meat in the house, that limited our options. I decided to try the "Hot Veggie Dub" which, as listed on their website, includes potato, mozzarella, green pepper, banana pepper, onion, mushroom, and ranch.
Now, these are simply fantastic. This is also another meal that you can tailor to whatever you happen to have in your pantry at the time. Try taking a basic recipe dub found on their website & then just add or subtract ingredients as you see fit.
Our veggie dub consisted of the following:
3 small potatoes, cubed
1/2 green pepper, diced
1/2 medium onion, sliced
3-4 mushrooms, sliced
1 jalepeno, diced & seeded
1 clove garlic, crushed
1/2 yellow pepper soaked in water, diced (they come in a can...we found out that banana peppers all use artificial coloring, so we tried these instead, they are a good substitute)
shredded/sliced mozzarella & cheddar cheeses
tortillas
sour cream
BBQ sauce
ranch dressing
Sautee the veggies in the above ingredients in oil (I used an oil/butter combo) until done. I started the potatoes first as they take the longest to cook, then the peppers, onion, etc. Once the filling is cooked, transfer to a bowl. Add a small amount of oil to the pan, add one tortilla. Top the tortilla with bits of shredded cheese (we used mozzarella and cheddar) and the filling. Cook until the cheese is melted. Remove from heat. Repeat until all of the veggie filling is used up (this depends on the size of the tortilla...we used small tortillas & with the amount of veggies we used, this made 4 very stuffed dubs). Top the tortillas with your choice of dressing (we used a sour cream/BBQ sauce combo on 3 and tried a ranch dressing on the 4th). Fold and serve.
Our tortillas turned out a little fried/crunchy, so they didn't fold as nicely. But still tasted great!! I definitely recommend the sour cream/BBQ sauce combo for the dressing. Amazing.
Again, simply changing ingredients, sauces, and cheeses around makes this an easy, yummy dinner that you won't get tired of. :)

So, I had the idea yesterday to try and make one at home, with ingredients that we had from the farmer's market. Since we didn't have any meat in the house, that limited our options. I decided to try the "Hot Veggie Dub" which, as listed on their website, includes potato, mozzarella, green pepper, banana pepper, onion, mushroom, and ranch.
Now, these are simply fantastic. This is also another meal that you can tailor to whatever you happen to have in your pantry at the time. Try taking a basic recipe dub found on their website & then just add or subtract ingredients as you see fit.
Our veggie dub consisted of the following:
3 small potatoes, cubed
1/2 green pepper, diced
1/2 medium onion, sliced
3-4 mushrooms, sliced
1 jalepeno, diced & seeded
1 clove garlic, crushed
1/2 yellow pepper soaked in water, diced (they come in a can...we found out that banana peppers all use artificial coloring, so we tried these instead, they are a good substitute)
shredded/sliced mozzarella & cheddar cheeses
tortillas
sour cream
BBQ sauce
ranch dressing
Sautee the veggies in the above ingredients in oil (I used an oil/butter combo) until done. I started the potatoes first as they take the longest to cook, then the peppers, onion, etc. Once the filling is cooked, transfer to a bowl. Add a small amount of oil to the pan, add one tortilla. Top the tortilla with bits of shredded cheese (we used mozzarella and cheddar) and the filling. Cook until the cheese is melted. Remove from heat. Repeat until all of the veggie filling is used up (this depends on the size of the tortilla...we used small tortillas & with the amount of veggies we used, this made 4 very stuffed dubs). Top the tortillas with your choice of dressing (we used a sour cream/BBQ sauce combo on 3 and tried a ranch dressing on the 4th). Fold and serve.

Our tortillas turned out a little fried/crunchy, so they didn't fold as nicely. But still tasted great!! I definitely recommend the sour cream/BBQ sauce combo for the dressing. Amazing.
Again, simply changing ingredients, sauces, and cheeses around makes this an easy, yummy dinner that you won't get tired of. :)
Monday, August 17, 2009
Breakfast for dinner
One of my favorite things to make for dinner is breakfast food. I usually always have ingredients on hand, and it is very easy just to change things up slightly. Breakfast food for dinner is also a favorite of my Dad, so I suppose my love of the same stemmed from him.
Breakfast food can range to any of the following (& mix and match):
-Scrambled eggs. If you desire, try chopping up a variety of veggies (onion, mushroom, green pepper, etc) & stirring it in with the eggs.
-Omelette. These are fun because they can be varied greatly by what you put in them. Try mixing in dried spices (Italian seasoning, oregano, thyme, basil, parsley) in with the egg mix. Try mixing up different cheeses (American, colby, monterey jack, mozzarella, pretty much anything). Try mixing & matching different veggies (onions, tomato, mushrooms, assorted peppers, etc).
-French toast (in case you don't know how to make it--mix a couple eggs & a splash or two of milk, & cinnamon in a bowl. Dredge slices of bread through the mixture & cook in a pan until browned (flipping occasionally)).
-Homemade hash browns (julienne a couple of potatoes & chop up a small onion. Add basil, salt & pepper. add an egg and some flour. Add a layer of olive oil in a pan. Add the potato mix to the pan & let it cook for about 5 minutes each side).
-Toast. Mix it up with different jams, or add a little bit of peanut butter.
Try it some night! & don't forget the juice. :)
Tuesday, August 11, 2009
Homemade Applesauce
Eating real food.
What does that mean, exactly? In a country which is geared toward convenience food and everything travels miles (sometimes thousands and across country borders) to get to the grocery shelf, it may be more complicated than you think.
To explore this idea of eating real food, my boyfriend created a website titled just that. It will showcase articles of sorts to eat local food, more sustainable food, practices, etc. It will also showcase recipes made with food that fit in with these principles. To check it out, go to http://www.eatingrealfood.com/.
On that note, I will be writing recipes for that site & if you frequent both, my recipes here may be double-posted there (although I will try to make the posts a little different & spice it up a bit).
I posted yesterday on eatingrealfood about making homemade applesauce. I know of 2 different ways to make applesauce. Growing up, my grandpa owned an apple orchard. So every fall, we had our fair share of fresh apples to use and there were lots of pies and applesauces made. :) My mom used one method, my grandma used another. Don't tell...but I've always preferred my grandma's method.
My mom's method was to wash & core the apples and to slice them into a pot filled with maybe an inch of water. You will want to adjust the water level according to how many apples you are using (obviously you don't need a ton of water if you are just cooking up 4-5 apples). Cook the apples on medium to medium-low heat until they are soft & mushy. Remove from heat and strain through a food strainer to strain out the skin. If you use red apples, this applesauce usually turns out pink in color. Add sugar and cinnamon to taste. That's it! Fairly easy (unless you don't have a food strainer...which brings me to.....)
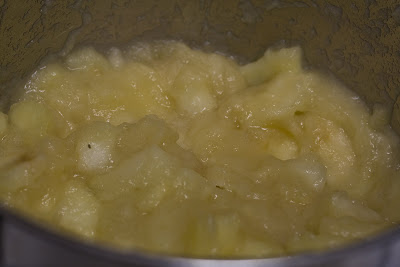
My grandma's method was to wash, core, and peel the apples & then cook them in a pot (same way as above). This time, once the apples are done, mash the leftover bits with a potato masher until a smooth-ish/chunky sauce results. This applesauce usually is a white-ish/tan color. Add sugar & cinnamon to taste. This applesauce may take slightly longer to cook as you need to make sure its mushy enough, & peeling all those apples is hard work (but you don't need much in the way of equipment).
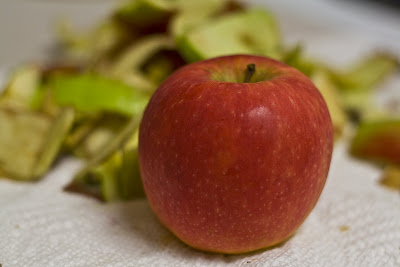
Now, you may be wondering what apples to use? Well, I never paid close attention to which kind my grandpa grew. The batch I made for these pictures used 4-5 Viking apples (which are very tart) & one Pink Lady. Tart apples, IMO, yield a better taste even though you have to add more sugar, but it is up to you. I made a batch the other day with Fuji apples (which are supposed to be excellent for applesauce, or so I read), but they didn't cook down hardly at all & left more chunks after mashed with the potato masher. So just experiment with your favorite type of apple. If you are making a large batch to can, I would suggest using a few different varieties of apples.

I plan on making a larger batch to can for the winter as it gets further into the fall & apple season, so stay tuned!

What does that mean, exactly? In a country which is geared toward convenience food and everything travels miles (sometimes thousands and across country borders) to get to the grocery shelf, it may be more complicated than you think.
To explore this idea of eating real food, my boyfriend created a website titled just that. It will showcase articles of sorts to eat local food, more sustainable food, practices, etc. It will also showcase recipes made with food that fit in with these principles. To check it out, go to http://www.eatingrealfood.com/.
On that note, I will be writing recipes for that site & if you frequent both, my recipes here may be double-posted there (although I will try to make the posts a little different & spice it up a bit).
I posted yesterday on eatingrealfood about making homemade applesauce. I know of 2 different ways to make applesauce. Growing up, my grandpa owned an apple orchard. So every fall, we had our fair share of fresh apples to use and there were lots of pies and applesauces made. :) My mom used one method, my grandma used another. Don't tell...but I've always preferred my grandma's method.

My mom's method was to wash & core the apples and to slice them into a pot filled with maybe an inch of water. You will want to adjust the water level according to how many apples you are using (obviously you don't need a ton of water if you are just cooking up 4-5 apples). Cook the apples on medium to medium-low heat until they are soft & mushy. Remove from heat and strain through a food strainer to strain out the skin. If you use red apples, this applesauce usually turns out pink in color. Add sugar and cinnamon to taste. That's it! Fairly easy (unless you don't have a food strainer...which brings me to.....)
My grandma's method was to wash, core, and peel the apples & then cook them in a pot (same way as above). This time, once the apples are done, mash the leftover bits with a potato masher until a smooth-ish/chunky sauce results. This applesauce usually is a white-ish/tan color. Add sugar & cinnamon to taste. This applesauce may take slightly longer to cook as you need to make sure its mushy enough, & peeling all those apples is hard work (but you don't need much in the way of equipment).
Now, you may be wondering what apples to use? Well, I never paid close attention to which kind my grandpa grew. The batch I made for these pictures used 4-5 Viking apples (which are very tart) & one Pink Lady. Tart apples, IMO, yield a better taste even though you have to add more sugar, but it is up to you. I made a batch the other day with Fuji apples (which are supposed to be excellent for applesauce, or so I read), but they didn't cook down hardly at all & left more chunks after mashed with the potato masher. So just experiment with your favorite type of apple. If you are making a large batch to can, I would suggest using a few different varieties of apples.

I plan on making a larger batch to can for the winter as it gets further into the fall & apple season, so stay tuned!
Monday, August 10, 2009
Iced tea
So, I have this mint plant that has grown like a weed. It has long drape-y tendrils over its pot, creeping across my balcony. I don't know that many uses for mint, besides making a mojito (which are quite yummy). So, I decided to try using it in tea.

There are many ways you can use the mint in tea. Here are a couple of ways that I've used it:
1. Just add a stalk of mint (leaves attached) to your glass of iced tea. Pinch the leaves between your fingers before adding so that the leaves release a little of their oil.
2. Boil 4c. water + a bunch of mint leaves + 1 c. sugar, then steep green tea bags according to directions on box. Remove mint leaves & tea bags. Makes for a sweet minty green tea. Adjust sugar according to tastes, 1c. was a little too sweet for my taste.
3. My favorite method: Boil 4-5 c. water + a bunch of mint leaves. Remove from heat, add 4-5 Lipton tea bags (regular flavor). Let steep 5 or so minutes. Remove mint leaves & tea bags. Add sugar for desired sweetness. Pour into a jar, add a little bit of ice to cool it down (not too much or it will be too watery). Add lemon. Chill in the fridge. :)
Iced tea is very refreshing on a hot day! :)
Subscribe to:
Comments (Atom)
