So, my boyfriend has this habit of getting home later than he plans. This happens quite frequently, at least 1-2 times if not more per week. When he gets home late, I don't feel like cooking anything that takes effort & time to make. & did I mention we live in the middle of nowhere--no running somewhere for a quick bite to eat (& who wants to spend $$ anyways?). So this is one of the times when I usually have at least a jar of pasta sauce & a couple different kinds of pasta on hand to whip up a quick batch of pasta for dinner. BO-RING.
However, pasta can go from ho-hum to at least decent with a few easy additions, such as:
-Using different kinds of pasta. For example, a spinach fettuccine & regular fettuccine.
-Adding sauteed mushrooms to the sauce, or another veggie of your choice (green pepper, onion, fresh tomato)
-Add spices. Oregano, Italian seasoning, basil, rosemary, parsley, onion powder, garlic powder. Combine at will.
-I always add a little bit of Italian bread crumbs to make the sauce a little thicker.
-Top with a little bit of Parmesan cheese.
-Serve with cheesy garlic bread (butter bread of your choice, sprinkle garlic powder (& Italian seasoning if desired), top with mozzarella cheese, broil until cheese starts to brown)
& now your pasta doesn't have to be so boring!
Thursday, July 30, 2009
Friday, July 24, 2009
Shallow-fried veggies with aioli
Shallow-fried. The lesser known brother to the deep fry. Still "frying" something. Plus aioli, which is mainly made up of....olive oil. Whooooo fatty foods!!!!!!!!!!!!!!!!! Clogged artery, here I come!!!

I recently received a cookbook titled "The Art of Simple Food" by Alice Walters. While browsing through the first few pages, I noted two things: One, a recipe for aioli, which is a garlic mayonnaise that is used sometimes in Spanish dishes (& I always immediately want to try anything & everything that might remind me of my time in Spain, or anything Spanish at all for that matter). Two, how to shallow-fry foods (important because I recently watched a video on making tempura veggies, which I love). My mind went "HEY! Bright Idea! Let's shallow fry some veggies that I have sitting around, & serve them with the aioli as a dipping sauce! Should be good!". Hahaha.
I set about making the aioli first, as it says that it should set for a 1/2 hour at least before serving. It should be noted before you make the aioli that you definitely use an egg YOLK not the egg white. My brain got all confuddled & used an egg white at first, it didn't turn out very pretty.
Aioli:
Smash 2-3 garlic cloves (I used 2 probably too large cloves...it was almost too garlicky) to a pulp (book said to use a mortar & pestle, which I don't have. I used a mixing bowl & the end of my pizza cutter (which is wooden & flat). This did not yield the exactly smooth garlic, it was still slightly chunky. But try to make it as smooth as possible). Add a pinch of salt to the garlic.
Add 1 egg yolk to a bowl (save the white for later!). Add 1/2 tsp. water. Mix. Add 1 c. olive oil, starting out with just a littlte bit & whisking continually. As you go, it'll thicken up & turn an opaque-y yellow color. Whisk & add oil until its all mixed in. Add garlic. Add spices & garlic & salt to taste. Refrigerate until serving.
NOTE: This makes a LOT of aioli. The book said its best used the same day you make it. Do what you will with that info.
Shallow-fried veggies:
For the oil, I used a mixture of clarified butter and olive oil. You may be asking yourself "What the heck is clarified butter & how do I buy or make it?!?!" Well, I don't know about buying it, but the book just said to melt butter (I used probably around 2/3-1 c. unsalted real butter (not margarine) on med. heat for about 10 minutes. You'll see some white stuff floating on the top. Strain that off (I spooned it off). Voila. Then just add olive oil to that until its ~1/4 to 1/2" thick.
Cut up veggies while the butter is being clarified (I used mushrooms, summer squash, red & yellow pepper, & onion. I also tried to use some cheese squares......I do not reccommend you try that. It doesn't end well). Sprinkle with salt & pepper & whatever herbs you want, & coat with that egg white that was leftover from the aioli.
Once the oil is ready, dredge the veggies through some flour (makes for a nice, very light batter coating), & fry for a couple minutes until they are done (NOTE: I had so many veggies, that I had to go through several rounds of the dredging/frying until everything was done).
Serve the veggies with bread & the aioli. :) I accidentally made wayyyy too much food for just my boyfriend & I, so sadly, a lot got wasted. So adjust accordingly.
What did I learn from today? Do not fry cheese...it doesn't turn out well. In fact, it just turns into a big slop of melted cheese. Less is more--use less veggies & less aioli next time, or serve for a larger crowd. The veggies were actually pretty good with the light coating. The aioli would have been better had it been not as garlicky, & maybe if a different olive oil was used (since its the main ingredient, the flavor of the oil sticks out).
Try at your own risk (of health and taste buds).

I recently received a cookbook titled "The Art of Simple Food" by Alice Walters. While browsing through the first few pages, I noted two things: One, a recipe for aioli, which is a garlic mayonnaise that is used sometimes in Spanish dishes (& I always immediately want to try anything & everything that might remind me of my time in Spain, or anything Spanish at all for that matter). Two, how to shallow-fry foods (important because I recently watched a video on making tempura veggies, which I love). My mind went "HEY! Bright Idea! Let's shallow fry some veggies that I have sitting around, & serve them with the aioli as a dipping sauce! Should be good!". Hahaha.
I set about making the aioli first, as it says that it should set for a 1/2 hour at least before serving. It should be noted before you make the aioli that you definitely use an egg YOLK not the egg white. My brain got all confuddled & used an egg white at first, it didn't turn out very pretty.
Aioli:

Smash 2-3 garlic cloves (I used 2 probably too large cloves...it was almost too garlicky) to a pulp (book said to use a mortar & pestle, which I don't have. I used a mixing bowl & the end of my pizza cutter (which is wooden & flat). This did not yield the exactly smooth garlic, it was still slightly chunky. But try to make it as smooth as possible). Add a pinch of salt to the garlic.
Add 1 egg yolk to a bowl (save the white for later!). Add 1/2 tsp. water. Mix. Add 1 c. olive oil, starting out with just a littlte bit & whisking continually. As you go, it'll thicken up & turn an opaque-y yellow color. Whisk & add oil until its all mixed in. Add garlic. Add spices & garlic & salt to taste. Refrigerate until serving.
NOTE: This makes a LOT of aioli. The book said its best used the same day you make it. Do what you will with that info.
Shallow-fried veggies:
For the oil, I used a mixture of clarified butter and olive oil. You may be asking yourself "What the heck is clarified butter & how do I buy or make it?!?!" Well, I don't know about buying it, but the book just said to melt butter (I used probably around 2/3-1 c. unsalted real butter (not margarine) on med. heat for about 10 minutes. You'll see some white stuff floating on the top. Strain that off (I spooned it off). Voila. Then just add olive oil to that until its ~1/4 to 1/2" thick.
Cut up veggies while the butter is being clarified (I used mushrooms, summer squash, red & yellow pepper, & onion. I also tried to use some cheese squares......I do not reccommend you try that. It doesn't end well). Sprinkle with salt & pepper & whatever herbs you want, & coat with that egg white that was leftover from the aioli.
Once the oil is ready, dredge the veggies through some flour (makes for a nice, very light batter coating), & fry for a couple minutes until they are done (NOTE: I had so many veggies, that I had to go through several rounds of the dredging/frying until everything was done).
Serve the veggies with bread & the aioli. :) I accidentally made wayyyy too much food for just my boyfriend & I, so sadly, a lot got wasted. So adjust accordingly.
What did I learn from today? Do not fry cheese...it doesn't turn out well. In fact, it just turns into a big slop of melted cheese. Less is more--use less veggies & less aioli next time, or serve for a larger crowd. The veggies were actually pretty good with the light coating. The aioli would have been better had it been not as garlicky, & maybe if a different olive oil was used (since its the main ingredient, the flavor of the oil sticks out).
Try at your own risk (of health and taste buds).
Sunday, July 19, 2009
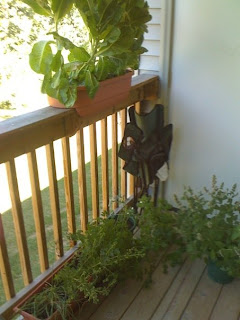
Container garden update
I thought I should give an update with what has been going on with my container garden.
Well, lets just say...most of the plants have been outstanding successes! My tomato plant is absolutely HUGE (I am 5'10" and it comes up to just above chest level) and producing lots of tomatos (can't wait until they are ripe!). My lettuce touches the balcony ceiling now. The catnip & mint have grown like weeds. I also added a hen & chick plant and moss to the multitude of plants. The pepper plant almost died, but is making a comeback (although it is currently infested with aphids, stupid little buggers), and may be starting to produce a few peppers (*crosses fingers*).
I continually use my herbs in dishes; I use the basil and rosemary most often. The cats continue to love the catnip, and I've dried a few stalks & will dry out more to stuff in cat toys that I am planning on making.
The one thing that I haven't figured out yet how to use is the mint, besides in mojitos. I may try making a mint tea & some mint sugar to keep around. Any suggestions will be welcome!
Pictures of my balcony (taken from my phone, so they aren't the greatest...& yes, I modpodged magazine clippings over the plain white 5-gallon buckets):


Wednesday, July 15, 2009
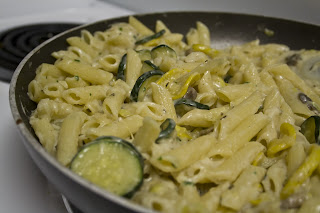
Veggie Penne
Made this pasta dish last night. Big hit, its very tasty. Since this uses a lot of veggies & a whole box of pasta, this is a great dish for families. For just my boyfriend & I, there is a lot leftover (which I plan on eating for the next few lunches). I love leftovers as it means I don't have to cook nor worry about fixing a lunch for myself in the morning! :)
Recipe credit goes to allrecipes.com. But of course, I made a few changes.
Ingredients:
1 box of penne
1/2 of a medium onion, sliced
1 summer squash, sliced
1 zucchini, sliced
4-6 sliced fresh mushrooms (or however many you want)
1 clove minced garlic
3 Tbs butter
1-2 Tbs. all-purpose flour
1/2 tsp. salt
1/4 tsp. parsley flakes (I use some of my fresh parsley, prob. about a tsp)
1/4 tsp. dried thyme
1/4 tsp pepper
1/4 - 1/2 c. milk (i used skim milk) (NOTE: original recipe says to use heavy whipping cream, but I didn't have any & didn't want to buy any. The milk worked just fine.)
cheese of your choice (I used mozzarella. Parmesan would also be good)
Cook pasta according to package directions.
Saute veggies & garlic in the butter until tender & the zucchini/squash starts to brown.
Whisk flour & milk in a small bowl until smooth, add seasonings.
Add sauce to the veggies. NOTE: the veggies will soak up most of the sauce. I started out using 1 Tbs flour & 1/4 c. milk like the original recipe, poured that over the veggies, & then added a little more milk/flour.
Add pasta & mix.
Add cheese, mix, serve with bread.
Enjoy!!!!
Recipe credit goes to allrecipes.com. But of course, I made a few changes.

Ingredients:
1 box of penne
1/2 of a medium onion, sliced
1 summer squash, sliced
1 zucchini, sliced
4-6 sliced fresh mushrooms (or however many you want)
1 clove minced garlic
3 Tbs butter
1-2 Tbs. all-purpose flour
1/2 tsp. salt
1/4 tsp. parsley flakes (I use some of my fresh parsley, prob. about a tsp)
1/4 tsp. dried thyme
1/4 tsp pepper
1/4 - 1/2 c. milk (i used skim milk) (NOTE: original recipe says to use heavy whipping cream, but I didn't have any & didn't want to buy any. The milk worked just fine.)
cheese of your choice (I used mozzarella. Parmesan would also be good)
Cook pasta according to package directions.
Saute veggies & garlic in the butter until tender & the zucchini/squash starts to brown.
Whisk flour & milk in a small bowl until smooth, add seasonings.
Add sauce to the veggies. NOTE: the veggies will soak up most of the sauce. I started out using 1 Tbs flour & 1/4 c. milk like the original recipe, poured that over the veggies, & then added a little more milk/flour.
Add pasta & mix.
Add cheese, mix, serve with bread.
Enjoy!!!!
Friday, July 10, 2009
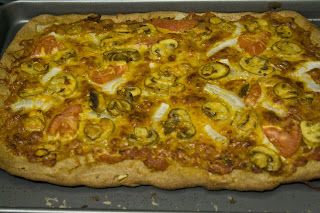
Homemade Pizza
I've been meaning to post this entry for awhile now and am now just getting around to posting it. The following recipe for homemade pizza can be altered in many ways to suit your tastes, and my boyfriend & I like this so much, its now our weekly Sunday dinner.
We usually tag-team this meal. He makes the crust while I make the sauce, & then we chop up toppings & make a cheesy garlic bread for breadsticks. If you are making this by yourself, I recommend that you make the sauce first, as it has to cook for awhile, & while the sauce is cooking, make the crust, & then chop up toppings. While the pizza is baking, fix the breadsticks so that they can go in the oven when the pizza is done.
Crust recipe:
1 pkg rapid rise yeast
1 c. warm water
1 tsp. sugar
1 tsp. salt
2 Tbs. olive oil
2.5 c. flour (we use whole wheat flour)
rosemary, basil, & garlic to taste (I usually grab a few rosemary springs & basil leaves off of my plants & I think we use one clove of garlic)
In a large bowl, combine yeast and warm water & let sit for a few minutes. Stir in sugar, salt, olive oil. Add rosemary, basil, & garlic. Stir in flour, bit by bit, until dough reaches a thick consistency. Roll out dough on cookie sheet into crust (spray cookie sheet with non-stick cooking spray before rolling out dough). If you want to be fancy, line the outside edges with olive oil & sprinkle some seasonings (garlic powder, italian seasoning, etc) around the edges.
Sauce:
Olive oil
Onions (diced)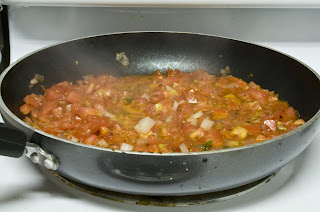
Minced garlic
Salt/pepper
Basil (we usually add a little rosemary too)
Red wine (you will only need a few splashes...we usually drink the rest of the bottle w/ dinner)
3-4 med. tomatoes, diced
Add olive oil, onions, & garlic to pan; cook until onions are translucent. Add salt, pepper, basil, other herbs. Add wine & let cook for a couple of minutes to let the alcohol burn off. Add tomatoes. Reduce heat & simmer for 30 minutes or until a thick sauce forms.
Spread sauce onto crust, add toppings. Bake at 425 degrees for 15-20 minutes or until crust edges are browned.
The toppings that we have used usually include any leftover onion & tomato, some mushrooms, & green pepper. We have also varied the cheeses, from a mix of shredded cheddar & mozzarella, to using shredded parmesan, asiago, manchego, & mozzarella cheeses. Use whichever cheese you like best & have just lying around.
For the cheesy garlic bread (no pictures of that, sorry!), we just use a loaf of chibatta bread, cut into a few slices, butter one side, sprinkle with garlic powder & italian seasoning, top with mozzarella cheese. Set on a cookie sheet covered in foil, broil in oven on high until cheese is lightly browned.
The pizza may be more effort than you are willing to put in (much easier with 2 people tackling the cooking)...but its so worth it. The pizza & breadsticks are good, & healthier than restaurant pizza (whole wheat crust, homemade sauce, etc). Try it, you won't be disappointed! :)

We usually tag-team this meal. He makes the crust while I make the sauce, & then we chop up toppings & make a cheesy garlic bread for breadsticks. If you are making this by yourself, I recommend that you make the sauce first, as it has to cook for awhile, & while the sauce is cooking, make the crust, & then chop up toppings. While the pizza is baking, fix the breadsticks so that they can go in the oven when the pizza is done.

Crust recipe:
1 pkg rapid rise yeast
1 c. warm water
1 tsp. sugar
1 tsp. salt
2 Tbs. olive oil
2.5 c. flour (we use whole wheat flour)
rosemary, basil, & garlic to taste (I usually grab a few rosemary springs & basil leaves off of my plants & I think we use one clove of garlic)
In a large bowl, combine yeast and warm water & let sit for a few minutes. Stir in sugar, salt, olive oil. Add rosemary, basil, & garlic. Stir in flour, bit by bit, until dough reaches a thick consistency. Roll out dough on cookie sheet into crust (spray cookie sheet with non-stick cooking spray before rolling out dough). If you want to be fancy, line the outside edges with olive oil & sprinkle some seasonings (garlic powder, italian seasoning, etc) around the edges.
Sauce:
Olive oil
Onions (diced)

Minced garlic
Salt/pepper
Basil (we usually add a little rosemary too)
Red wine (you will only need a few splashes...we usually drink the rest of the bottle w/ dinner)
3-4 med. tomatoes, diced
Add olive oil, onions, & garlic to pan; cook until onions are translucent. Add salt, pepper, basil, other herbs. Add wine & let cook for a couple of minutes to let the alcohol burn off. Add tomatoes. Reduce heat & simmer for 30 minutes or until a thick sauce forms.
Spread sauce onto crust, add toppings. Bake at 425 degrees for 15-20 minutes or until crust edges are browned.
The toppings that we have used usually include any leftover onion & tomato, some mushrooms, & green pepper. We have also varied the cheeses, from a mix of shredded cheddar & mozzarella, to using shredded parmesan, asiago, manchego, & mozzarella cheeses. Use whichever cheese you like best & have just lying around.
For the cheesy garlic bread (no pictures of that, sorry!), we just use a loaf of chibatta bread, cut into a few slices, butter one side, sprinkle with garlic powder & italian seasoning, top with mozzarella cheese. Set on a cookie sheet covered in foil, broil in oven on high until cheese is lightly browned.
The pizza may be more effort than you are willing to put in (much easier with 2 people tackling the cooking)...but its so worth it. The pizza & breadsticks are good, & healthier than restaurant pizza (whole wheat crust, homemade sauce, etc). Try it, you won't be disappointed! :)
Tuesday, July 7, 2009
Blueberry Pie
Well I haven't updated in awhile. =/ (Hi, my name is Captain Obvious)
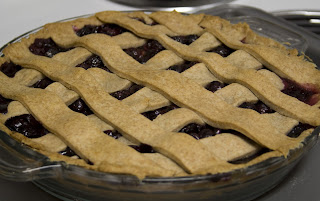
Decided to make a blueberry pie, with the abundance of blueberries I picked up at the store the other day. Searched for recipes for the filling & crust, & wanted to make it a tad "healthier" than a normal pie.
Here is what I came up with.
Crust:
Used a recipe I found at wholefoods.com with some adjustments:
I didn't have whole wheat pastry flour (& the ONLY bag I found was $7.99...way too darn expensive!).
3/4 c. whole wheat flour
1/2 c. all-purpose white flour
1/8 tsp. salt
7 Tbs. cold butter
NOTE: you will need to double this recipe--into separate bowls (one for top crust, one for bottom).
Mix flour & salt together. Add butter & cut in with a pastry thing (makes a crumbly, mostly flour, mix). Add 2-3 Tbs. cold water (I used water from the Brita pitcher in my fridge), adding in a 1/2 Tbs at a time. Using your hands, mix dough together into a ball until no longer crumbly. Chill in the fridge for ~30 minutes.
Filling:
Used a recipe found at allrecipes.com, with minor adjustments.
3/4 c. sugar (note: I used cane sugar)
5 Tbs. cornstarch
1/4 tsp. salt
1/2 tsp cinnamon
4c. blueberries
2 Tbs. lemon juice
1 Tbs. butter
Combine the first 4 ingredients in a bowl. Wash blueberries & dry (I just put them on a paper towel to soak up some of the water). Add blueberries to bowl, add lemon juice.
Roll out one of the dough sections. Put in pie dish & cut edges to fit. Add filling. Add the tbs. of butter in slabs on the top. Roll out the other section of dough. Cut into strips & line on top in a lattice pattern. Crimp edges.
Bake at 375 degrees for 1 hr to 1 hr 15 minutes, or until it begins to brown.
Subscribe to:
Comments (Atom)
